Last Updated on August 19, 2026
“Knowing how to insert branula is not enough. A doctor should also master chest tube insertion, as good as branula insertion”
Introduction
2 methods
• Open method
• Closed method (do not use this method)
Important parts of a chest tube
• Radio-opaque tip and a marker strip along the edge
• Fenestrated end (with holes for drainage of air / fluid)
Chest drainage system
Types
• Single-bottle system (underwater seal)
• Two-compartment system (underwater seal)
• Three-compartment system (underwater seal)
• Wet-suction
• Dry suction
Underwater seal system – 1-bottle system
• Tip of the rigid straw is immersed at least
• [tooltips keyword=’Disadvantages”]• Bottle must be below the patient, e.g. on the floor beside patient
• The deeper the tip of rigid straw below water level, more pressure will be required to force air/fluid out of pleural cavity
=====
Further reading:
Chest drainage systems in use, by NIH
Underwater seal drainage system, by LITFL
Inspiration, by LibreTexts
Chest tube Insertion
Indications
(i) Pneumothorax / tension pneumothorax
(ii) Pleural effusion
• Empyema
• Haemothorax
• Chylothorax
(iii) Post-op
• Post thoracotomy
• Post VATS
Complications
During insertion
• Injury to internal organs / structures e.g. , liver, spleen, diaphragm
• Bleeding
Post-insertion
• Infection
• [tooltips keyword=’Subcutaneous emphysema”]Can be prevented by ensuring the fenestrated end of chest tube is completely inserted into pleural cavity
• Improper placement / Chest tube dislodgement
• Re-expansion pulmonary oedema
Equipment
• Gown, sterile gloves, mask Use nonabsorbable suture • Braided, to increase knot security No definitive rule to determine appropriate size of chest tube used Adult Paediatrics **For draining blood (Haemothorax), use larger tube, i.e. 32 Fr
• Sterile drapes
• Dressing set / ‘Pneumothorax set’
• Gauze
• Antiseptic solution e.g. chlorhexidine
• Curved blunt artery forceps
• Needle holder
• Scissors
• Scalpel blade size 10
• Syringe: 10 mL x2
• Needle: 1 green, 1 blue needle
• Adhesive dressing tape (e.g. Hypafix®)
• Lignocaine 1%
•
Suture
• Chest tube of
appropriate size
• Man: 28 – 32 Fr
• Woman: 28 Fr
**The chest tube size is either 28 Fr or 32 Fr. 30 Fr is not available.
• Newborn less than 2 kg: 8 Fr
• Newborn more than 2 kg: 10 Fr
• Older children: 12 – 18 Fr
Pre-Insertion
• Ensure correct indications • Explain the indication
• Ensure correct patient
• Ensure correct site
•
Consent
• Explain the complication especially pain, which can be severe but will give analgesia prior to, during and post insertion
Inserting a chest tube
• Mark the
safety triangle
Safety Triangle Why safety triangle is important? Notes: • Lying at 40 – 60° e.g. Chlorhexidine Hold the blade like holding a pencil, for better stability • Transverse incision, parallel to the rib; NOT vertical incision • Do not make an incision too posterior to the mid-axillary line Remember to split near the upper border of the rib below to avoid injury to neurovascular bundle Be careful, not to injure the lungs / diaphragm Feel above and below the tract If adhesion is present, the chest tube might not be inserted into the pleural space • Towards apex of lung for pneumothorax • Periodic presence of air bubble in the underwater seal
 Borders of safety triangle
• Anterior border: Lateral border of pectoralis major
• Lateral border: Lateral border of latissimus dorsi
• Inferior border: 5th intercostal space
• A site with minimised risk of internal organ perforation during chest tube insertion
• For maximum exposure of safety triangle, externally rotate the ipsilateral arm with hand above the head
•
Positioning
• Ipsilateral arm externally rotated with hand above the head, to give better exposure to safety triangle
• Clean area of insertion with
antiseptic solution
• Drape the area of insertion
• Syringe out 1% lignocaine then infiltrate to the area of interest (using blue needle)
• Use
scalpel blade
• Skin incision can be big for better visualisation, when splitting the muscle layers later.
• Once subcutaneous layer is cut,
split muscle layers
• Use curved blunt artery forceps to
pass through the parietal pleura
• Once pleura is passed through, there should be a gush of air / fluid
•
Insert your index finger
• Remove trocar from the chest tube
• Place blunt artery forceps at the fenestrated end of chest tube
• Use blunt artery forceps to guide chest tube into pleural cavity, to the
correct direction
• Towards base of lungs for pleural effusion
• Release the blunt artery forceps, then advance the chest tube into pleural space
• Ensure all fenestrated areas are inside the pleural cavity
• Connect chest tube to underwater seal system
• Check whether the chest drain is
functioning
• Fluctuation of fluid level in water-seal chamber / inside the chest tube
• Secure chest tube with Silk 0 suture
• Also, suture the skin incision site
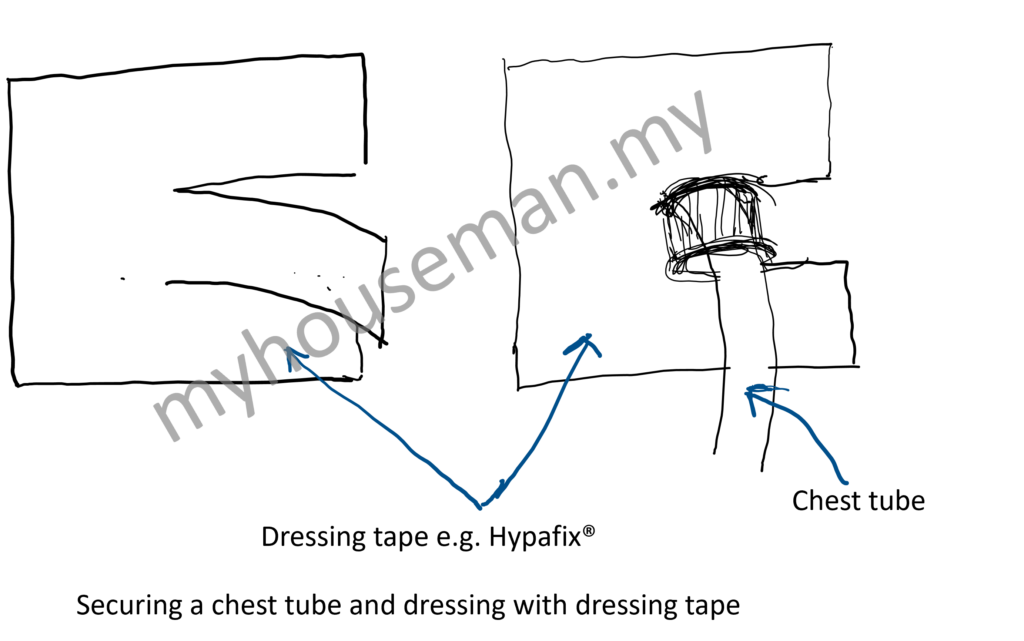
• Apply sterile occlusive dressing to the chest tube as shown below:
Video
Chest tube removal / Re-anchoring
Steps
• Teach patient Valsalva manoeuvre (i.e. breath holding on maximal inspiration Same as chest tube insertion, i.e. ipsilateral arm externally rotated with hand above the head Pursed-String Suture Pursed-String Suture
•
Positioning
• Prepare the equipment
• Clean the area of chest tube insertion site with chlorhexidine
• Drape the area of chest tube insertion site
• Clamp the chest tube e.g. using sponge forceps
• Make a
pursed-string suture
 Purpose: to provide primary closure / partial closure of round wound
• Instruct your assistant to pull out the chest tube when patient has inspired and is holding his breath
• Close the
pursed-string suture
Purpose: to provide primary closure / partial closure of round wound
Post chest tube removal
• Vital signs
• Examine the lungs: air entry bilaterally
• Repeat chest X ray
Chest tube removal / Re-anchoring set
• Dressing set
• Needle holder
• Stitch scissors
• Silk 0 suture (prepare 2)
• Gauze (prepare 2)
• Chlorhexidine
• 10 cc syringe
• Green needle; Blue needle
• Lignocaine for injection
• Tegaderm + dry gauze
Is the Chest Tube Functioning?
Yes, if:
• Periodic presence of air bubble in the underwater seal
• Fluctuation of fluid level in water-seal chamber / inside the chest tube
Other Knowledge Required
• Anatomy of
safety triangle
Safety Triangle Why safety triangle is important? Notes: Pursed-String Suture
Borders of safety triangle
• Anterior border: Lateral border of pectoralis major
• Lateral border: Lateral border of latissimus dorsi
• Inferior border: 5th intercostal space
• A site with minimised risk of internal organ perforation during chest tube insertion
• For maximum exposure of safety triangle, externally rotate the ipsilateral arm with hand above the head
• Suture technique e.g. Surgical Knot Tying: One-handed,
pursed-string suture
Purpose: to provide primary closure / partial closure of round wound
Miscellaneous
• Do not insert chest tube into an
open wound
Open wound due to trauma is contaminated, and it increases risk of infection Safety Triangle Why safety triangle is important? Notes:
Borders of safety triangle
• Anterior border: Lateral border of pectoralis major
• Lateral border: Lateral border of latissimus dorsi
• Inferior border: 5th intercostal space
• A site with minimised risk of internal organ perforation during chest tube insertion
• For maximum exposure of safety triangle, externally rotate the ipsilateral arm with hand above the head
Related Posts
Q&A
--- This content is for premium members only. ---